Android Navigation Component
Exploring Navigation Graph Concepts and Patterns
Android Jetpack’s Navigation Component is a framework that allows developers to define destinations and routes in a declarative way. In this post we’ll introduce Navigation Component concepts and explore common patterns.
Benefits of Navigation Component
There are many benefits of using Navigation Component framework for navigation. However, the two primary benefits are: Android Studio integration and type safety. The strong integration with Android Studio, helps to visualize the navigation graph of destinations and routes. The type-safety benefits come from generated code that makes missing required arguments obvious, and navigating to undefined routes impossible.*
*Navigating to undefined routes is still possible, but it requires avoiding the generated code.
Navigation without Navigation Component
Before getting into Navigation Component, let’s explore what navigation without Navigation Component is like, so we can see parallels and limitations to Navigation Component’s approach.
Activities
Navigating between Activities relies on Intents and calls to startActivity. This method is commonly used if the app architecture allows for multiple activities, and is still required when navigating to Activities other than your own.
// https://developer.android.com/training/basics/firstapp/starting-activity
fun navigateToExample() {
    startActivity(Intent(this, ExampleActivity::class.java))
}
Fragments
Fragent navigation relies on the FragmentManager and FragmentTransaction to transition users between screens. In the example below, when navigating between different screens, we reach for the FragmentManager and using a FragmentTransaction replace the contents of a container view, with new contents, optionally adding the current screen to the back stack.
// https://developer.android.com/guide/fragments/fragmentmanager
// https://developer.android.com/guide/fragments/transactions
fun navigateToExample() {
    supportFragmentManager.commit { fragmentTransaction ->
        fragmentTransaction.replace<ExampleFragment>(R.id.fragment_container)
        fragmentTransaction.addToBackStack(null) // Optional
    }
}
When an application’s architecture has a combination of both fragments and activities it is common to find both of these navigation approaches. The benefit to these approaches is that navigation tends to be simple on the surface. However, as an application scales to a large number of screens each with their own data requirements, it can be easy to overlook missing data in Activity bundles or Fragment argument bundles. When Reading and writing data from Bundles we also loose type safety Kotlin provides and most software developers have grown to value. Lastly, there is also an implicit dependency of routes between screens that is not easy to grok.
Introduction to the Navigation Framework
Navigation Component gives us greater type safety through a combination of XML and code generation. Along with being able to inspect the graph through code paths, Android Studio’s visualization is a way to quickly get acquainted with the routes and destinations in an application.
Before we continue, let’s define a few terms that are commonly referred to while working with Navigation Component.
- NavGraph refers to the navigation graph for the application. A collection of destinations and actions that define routes between destinations. Each NavGraph can contain one or more nested NavGraphs.
- NavHost refers to a host fragment for a NavGraph. The NavHost is a Fragment that exposes a NavController that makes navigation possible and applies the appropriate transitions when navigation is requested.
- NavController refers to the the component that provides a mechanism for requesting navigation. A fragment in the view hierarchy would use the NavController to request navigation to another location.
Starting a NavGraph
A NavGraph defines the destinations and routes for an application via an XML file. The nav graph is defined by the <navgiation> tag. Destinations as <fragment>s* with android:ids, and routes are defined by <action>s that contain an android:id for reference, and a destination id to replace the current screen.
*Other possible tags include <dialog> and <activity> and work the same way.
The following snippet of code defines a navigation graph with two destination fragments, HomeFragment and WorkFragment with a single route originating at the HomeFragment leading to the WorkFragment. The navigation’s app:startDestination defines the fragment that will be displayed initially.
// res/navigation/nav_graph.xml
<navigation xmlns:android="http://schemas.android.com/apk/res/android"
    xmlns:app="http://schemas.android.com/apk/res-auto"
    android:id="@+id/nav_graph_main"
    app:startDestination="@id/homeFragment">

    <fragment
        android:id="@+id/homeFragment"
        android:name="org.ocandroid.nav.fragment.HomeFragment">
				<!-- Action to route to @id/workFragment -->
        <action
            android:id="@+id/action_to_work"
            app:destination="@id/workFragment" />
    </fragment>

    <fragment
        android:id="@+id/workFragment"
        android:name="org.ocandroid.nav.fragment.WorkFragment"/>
</navigation>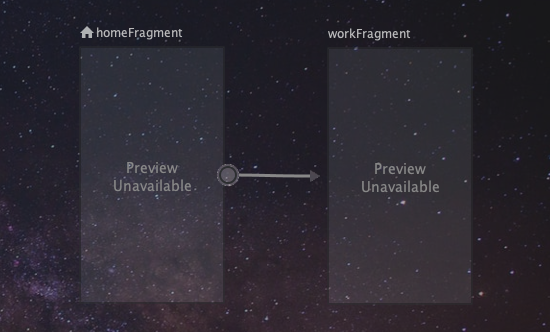
NavHost
In order to make use of the NavGraph we’ve defined above, we need to set-up a NavHost to contain our NavGraph. We do this by creating a FragmentContainerView in our main layout file. If your architecture allows, there is a good chance that there will only be one NavHost required for the entire application, and the main activity’s layout will not contain much else than the NavHost.
// partial snippet of: res/layout/activity_main.xml
<androidx.fragment.app.FragmentContainerView
    android:id="@+id/nav_host_fragment"
    android:name="androidx.navigation.fragment.NavHostFragment"
    app:defaultNavHost="true"
    app:navGraph="@navigation/nav_graph"
This FragmentContainerView encapsulates a NavHostFragment. The default nav graph is configured via the app:navGraph attribute. And since we can have multiple NavHost’s we can declare which should be our default host via app:defaultNavHost.
At this point running the application with this configuration will load the NavGraph we’ve defined and and we should be able to see the HomeFragment.
Although, we’ve defined routes that we can trigger via actions we need to add click handlers so that we can navigate on some user input.
Before we can do that we need to learn a bit more about NavController.
NavController: Navigating Forward
The NavController is exposed by the NavHost and is how the NavHost is notified we are ready to navigate. AndroidX provides extension functions for Fragment called findNavController that allows us to lookup the NavController for the current NavHost. Alternately, the static method NavHostFragment.findNavController(fragment) can be used.
After finding the NavController, it’s a matter of invoking navigate with our destination parameter.
// HomeFragment.kt
class HomeFragment: Fragment() {
    fun goToWork() {
        val navController = findNavController()
        val route = HomeFragmentDirections.actionToWork()
        navController.navigate(route)
    }
}
On executing the call to navigate the correct fragment transactions take place and the back stack is updated appropriately. HomeFragmentDirection class is generated code from our NavGraph XML.
A few things to keep in mind about this class and its methods are:
- If no actions are defined for a destination, then the class is not generated.
- A method is generated for each action of a destination.
- If a previously existing route is removed, then any existing code using that method will become a compile error.
By leveraging this functionality, we ensure we are defining routes for all destinations.
There is however a way around navigating to routes that are not declared that will result in a crash and circumvent the type safety described above.
The method uses the id assigned to the route’s action. However, ids do not account for any encapsulating destination, nor any required arguments, so it’s possible that method will lead to a run time crash.
// HomeFragment.kt
class HomeFragment: Fragment() {
    fun goToWork() {
        val navController = findNavController()
        val route = R.id.action_to_work
        navController.navigate(route)
    }
}
When there is no action defined for the destination or defined globally, then a crash will occur as the NavHost is unable to resolve the route from the current destination.
These two methods will allow us to navigate in a forward fashion to a destination. On every navigate invocation, we add our current destination to the backstack. Next let’s explore how navigating backwards into the backstack works.
NavController: Navigating Backward
Navigating to a previous screen only requires that we invoke popBackstack on the NavController. It’s a simple operation that removes the current destination from the backstack and returns to the previous screen.
// WorkFragment.kt
class WorkFragment: Fragment() {
    fun goBack() {
        val navController = findNavController()
        navController.popBackstack()
    }
}
A common scenario is the need to remove multiple screens from the backstack all at once. To do this, we can can also provide the id of the target destination that should be popped back to. All the intermediate destination fragments will be removed appropriately.
// WorkFragment.kt
class WorkFragment: Fragment() {
    fun goBack() {
        val navController = findNavController()
        val targetDestination = R.id.homeFragment
        navController.popBackstack(targetDestination)
    }
}
However, it’s possible that we don’t know the actual destination we want, but we do know a destination that started the current chain of routes. We can set the inclusive flag to pop the target destination also.
This scenario is common when we have a set of chained destinations like a sign-up flow that requires navigation back to the specific unknown origin that triggered the flow. The below example where we are on a supposed 42nd sing up step but need to pop back to the unknown origin before the first sign up step. This is required because the sign up could have come from one of N landing pages with a sing up call to action.
class SignUpStep42: Fragment() {
    fun onSuccess() {
        val navController = findNavController()
        val targetDestination = R.id.sign_up_step_1
        navController.popBackstack(targetDestination, false)
    }
}
We have now covered the basics of Navigation Component. Let’s get into a few other common scenarios that expand on the basic patterns we’ve seen.
Fragment Arguments
Passing data into a Fragment requires an arguments bundle. However, we are not instantiating fragments ourselves when we navigate with Navigation Component. To enable us to pass data to a destination, the destination definition allows us to define arguments expected by the destination.
<fragment
    android:id="@+id/workFragment"
    android:name="org.ocandroid.nav.fragment.WorkFragment">

    <argument
        android:name="role"
        app:argType="string"
        app:nullable="false" />

    <argument
        android:name="isDonutDay"
        android:defaultValue="false"
        app:argType="boolean" />
</fragment>
Argument definitions require an android:name and an app:argType and can specify if they are nullable via android:nullable. In turn, when the classes and methods for navigation are generated, they expect these arguments as parameters.
In the example below, we can see how the generated HomeFragmentDirections.actionToWork requires two parameters of the type we’ve defined in the XML. This gives us additional type safety when we trigger a navigation action. All the requirements on external data are enforced before navigation can occur.
// HomeFragment.kt
class HomeFragment: Fragment() {
    fun goToWork() {
        val navController = findNavController()
        val route = HomeFragmentDirections.actionToWork("Android Developer", true)
			  navController.navigate(route)
    }
}
With this in place, we can unpack the data in our Fragment. In Kotlin we can use the navArgs delegate to unpack the arguments into a generated WorkFragmentArgs class that contains our data and enforces our nullability constraints and defaults values in the destination definition.
// WorkFragment.kt
class WorkFragment : Fragment() {
    private val args: WorkFragmentArgs by navArgs()
    override fun onViewCreated(view: View, savedInstanceState: Bundle?) {
        val donutDay: Boolean = args.isDonutDay
        val role: String = args.role
        // Use argument values...
    }
}
With a typical arguments bundle, we would unpack the bundle ourselves and have to work around some of the possible null values by coercing to a non-null type(ie: !!) or using a null safe invocation (ie: ?.). This generated arguments class removes that requirement.
More Complex Navigation
Nested NaGraphs
As an application scales, it can become clear that having a massive XML file for all destinations and routes is not ideal. Navigation Component has support for nested navigation graphs. This means we can define <navigation> inside of itself, or <include> graphs into one another. Graphs all receive an id, and can themselves be part of an action to define a route.
// res/navigation/nav_graph.xml
<navigation xmlns:android="http://schemas.android.com/apk/res/android"
    xmlns:app="http://schemas.android.com/apk/res-auto"
    android:id="@+id/nav_graph"
    app:startDestination="@id/homeFragment">

   <!-- A Nested Navigation Graph! -->
   <navigation
        android:id="@+id/store_nav_graph"
        app:startDestination="@id/storeFragment"> ... </navigation>

</navigation>
We can take the nested nav graph, place it into its own file: store_nav_graph.xml. Then include the nav graph into our current one with via <include>.
// res/navigation/store_nav_graph.xml
<navigation xmlns:android="http://schemas.android.com/apk/res/android"
    xmlns:app="http://schemas.android.com/apk/res-auto"
    android:id="@+id/nav_graph"
    app:startDestination="@id/homeFragment">

   <!-- A Nested Navigation Graph! -->
    <include app:graph="@navigation/store_nav_graph" />

</navigation>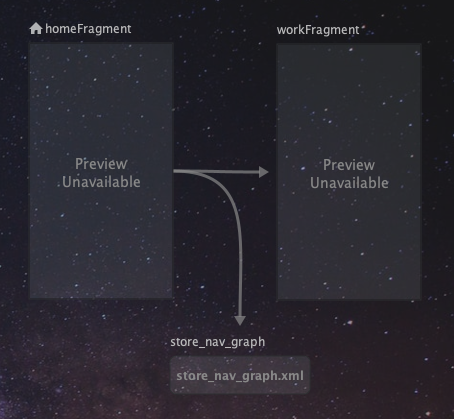
Nested nav graphs are nav graphs in their own right, and have only one starting point. Grouping items into a nested nav graph is most reasonable when sections of the graph have a single shared origin.
When we navigate to a nested nav graph, we will see its startDestination as the primary screen.
<fragment
    android:id="@+id/homeFragment"
    android:name="org.ocandroid.nav.fragment.HomeFragment">
    <!-- Navigating to a Nav Graph -->
    <action
        android:id="@+id/action_to_store"
        app:destination="@id/store_nav_graph" />
</fragment>
The primary benefit of nested nav graphs is to encapsulate related destinations, and to have smaller easier to consume files. This makes it simpler to track down where navigation occurs, and also focus on related components.
Nested navigation graphs can also serve to scope the lifetime of shared view models in a MVVM architecture. In those cases, the view models are created and shared while the nav graph nested nav graph is in scope.
Recursive Navigation
Navigation to fragments can also be recursive. We can have a destination with an action to navigate to itself. This might be common for components that display similar states with different dimensions of data.
<navigation xmlns:android="http://schemas.android.com/apk/res/android"
    xmlns:app="http://schemas.android.com/apk/res-auto"
    android:id="@+id/store_nav_graph"
    app:startDestination="@id/storeFragment">

    <fragment android:id="@+id/storeFragment" ...> ... </fragment>

    <fragment
        android:id="@+id/storeAileFragment"
        android:name="org.ocandroid.nav.fragment.StoreFragment">

        <!-- Recursively Navigate to storeAileFragment -->
        <action
            android:id="@+id/action_to_aile"
            app:destination="@id/storeAileFragment" />

        <action
            android:id="@+id/action_to_backroom"
            app:destination="@id/storeBackroomFragment" />
    </fragment>

    <fragment android:id="@+id/storeBackroomFragment" ... />
</navigation>
Forward Only Navigation
The default behavior of Navigation Component is to keep previous destinations on the back stack. However, this may not always be the desired effect. Navigation Component allows us to specify what should happen when a route’s destination is popped.
<action
    ...
    app:popUpTo="@id/homeFragment"
    app:popUpToInclusive="false"
    />
app:popUpTo describes a target destination when we pop back onto the current destination. app:popToInclusive describes if we should pop the target app:popUpTo destination also.
The result of this is that after executing this route’s action, a popBackstack action will pop the destination until the app:popUpTo destination is reached with consideration of the app:popUpToInclusive flag.
In a way this allows the origin to control what should happen on navController.popBackstack(). The origin is able to configure popBackstack to be the equivalent of navController.popBackstack(previous, true)
Animations
Navigation Component also lets us define animation transitions to be used with routes.
<action
    ...
    app:enterAnim="@anim/nav_default_enter_anim"
    app:exitAnim="@anim/nav_default_exit_anim"
    app:popEnterAnim="@anim/nav_default_pop_enter_anim"
    app:popExitAnim="@anim/nav_default_pop_exit_anim"
    />
app:enterAnim and app:exitAnim are used when entering and exiting the fragment. app:popEnterAnim and app:popExitAnim are used when navigating back to the fragment after a pop back stack operation. These animations can be customized via XML animation files in res/anim/.
Scaling with Navigation Component
As an application grows with Navigation Component, there are patterns that arise and issues that crop up.
Global Routes and Flat Navigation Graphs
XML nav graphs allow developers to define actions at the root level. These routes are then available to all destinations. However, by overusing global routes, you lose one of the primary benefits of the Nav Graph, the ability to visualize which destinations route to other destinations.
Global routes are low friction and may be necessary sometimes, but relying on them too much can greatly reduce the insight gained from knowing which destinations trigger each other.
Navigating to a Destination in a Nested Graph
While nested navigation graphs allow us to Colgate definitions for related destinations, when an application scales, there may be a need to navigate to a destination that’s inside of another navigation graph. This is not possible. The first work around for this is to define this destination in the parent navigation graph. The second work around is to eliminate the nested nav graph.
Which approach is best, depends on the complexity of each of the graphs.
However, depending on the app architecture, if you happen to be using view models that are typically scoped to a nav graph, it may be possible that you may not be able to scope the view models according to the nested navigation graph.
Non-Destination Fragments
Navigation Component will make the Fragment.newInstance pattern unnecessary for most fragments in your application. However, this pattern will still be needed for fragments contained within ViewPagers. This means that these fragments will also not benefit from safe args in the same way.
Secondly, if the incorrect FragmentStateAdapter is used for Fragments in a ViewPager, then findNavController might fail, since it might not walk the view hierarchy in the correct order.
Conclusion and Getting Started
In this post we’ve introduced Navigation Component concepts and explored some common patterns. There is a lot more that we did not cover in this post, however it should be a good entry point for anyone considering Navigation Component.
If you’re ready to get started have a look below for the basic dependencies. If you’re looking to go deeper or want to learn more, have a look below for additional resources related to Navigation Component.
Getting Started
If this all sounds like something you’d like to add to your project, then to get started with Navigation Component, you’ll need:
- an app that makes use of AndroidX
- an architecture that’s fragment focused
Then configure the Gradle build with dependencies as follows:
// /build.gradle
buildscript {
  dependencies {
    def nav_version = "2.3.5"
    classpath "androidx.navigation:navigation-safe-args-gradle-plugin:$nav_version"
  }
}

// /app/build.gradle
plugins { id 'androidx.navigation.safeargs' }
dependencies {
  def nav_version = "2.3.5"
  implementation "androidx.navigation:navigation-fragment-ktx:$nav_version"
  implementation "androidx.navigation:navigation-ui-ktx:$nav_version"
}